Reference Documentation 3.3.0
Table of Content
Following you will find the reference documentation corresponding to the 3.3.0 version. If you need an other version use one of our released versions.
- Table of Content
Overview
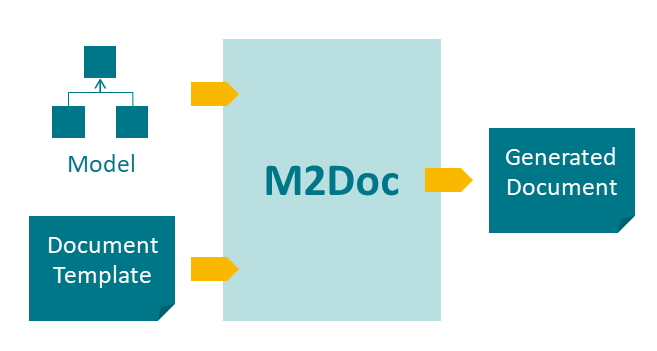
The M2Doc project provides Word document (.docx files) generation based on a document template and EMF models.
The overall approach consists in creating templates in the OOXML format where static text authoring benefits from the WYSIWYG capabilities of Microsoft Word. Dynamic parts are inserted using a dedicated vocabulary of OOXML fields code. Fields are mainly used to insert page numbers, references, etc. M2Doc makes use of them to describe documentation generation directives. This allows a total separation between the document and the M2Doc directives.
As an example, here is a fragment of a M2Doc template used to generate the documentation of a database model:
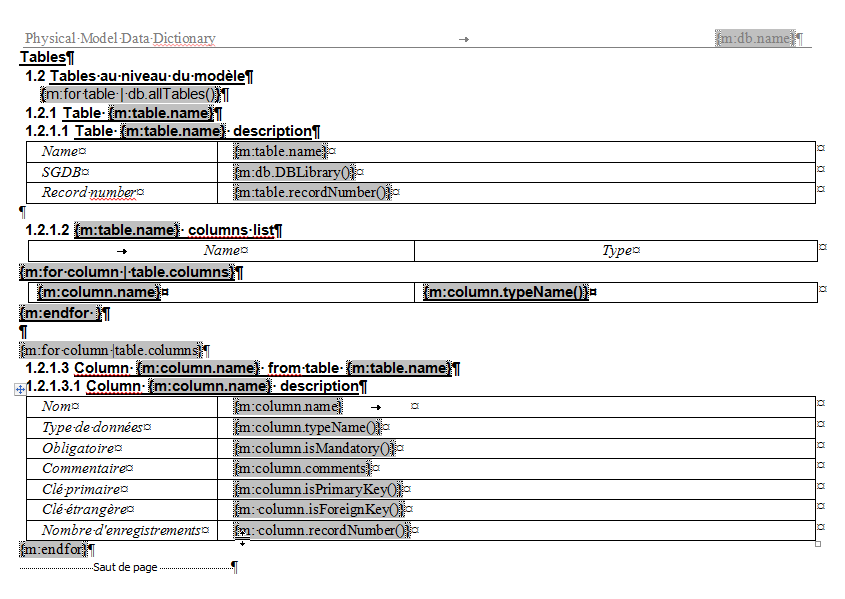
The generation looks like this:

The template language makes an extensive use of the Acceleo Query Language which provides a full-fledged, extensible model query language and engine. The M2Doc templates can be validated. If errors are found, an annotated templates is produced describing the problems found.
Principles
- Definition of model entry points
- Declaration of variables (see the Template properties wizard section)
- Mapping with model elements (see the Generation configuration wizard section)

- Extraction of information by navigating the model (see the Template authoring section)
- From the entry points
- Using model relations

- Formatting of the output information
- Using Microsoft Word functionalities

Main steps
- Definition of content, navigation, and format (see the Template authoring section)
- Declaration of variables (see the Template properties wizard section)
- Mapping of variables with model elements, definition of input model and output file (see the Generation configuration wizard section)
- Generation of output document (see the Generate a document section)

M2Doc roles
Ready to try M2Doc! You might have one of the following roles:
Template user
You already have the template and want to generate the document:
- see Generate a document
- see Maven (optional)
Template developer
You want to create your own template:
- see Template authoring
- see Provide new services (optional)
- see Validating a generation (optional)
- see Template testing (optional)
Integrator
You want to provide document generation in your own project using M2Doc:
- see Using M2Doc programmatically
- see Using AQL programmatically (optional)
Architecture
The main workflow:
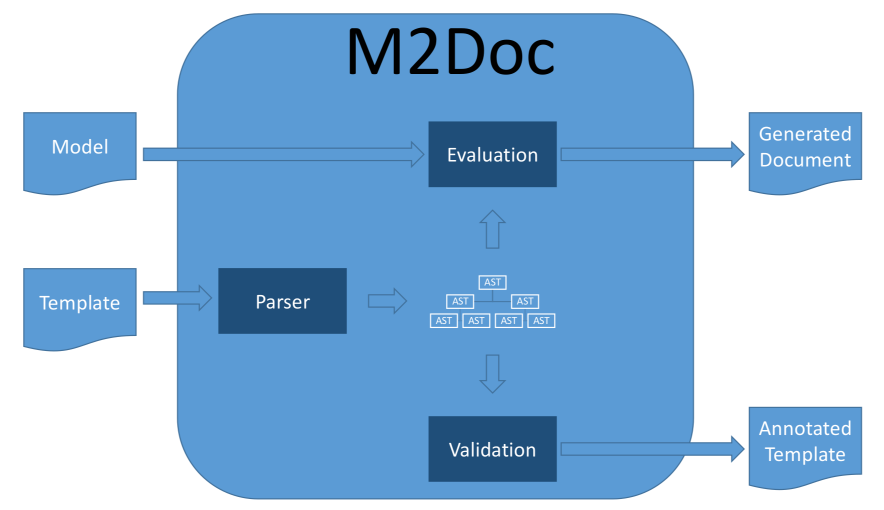
The template is parsed in an internal representation (the AST). From here you can bind the variables to their values, using elements from a model for instance and evaluate the template to generate the output document. An added benefit of using M2Doc is the hability to validate a template to produce an annotated template containing informations, warnings and errors the template might contain.
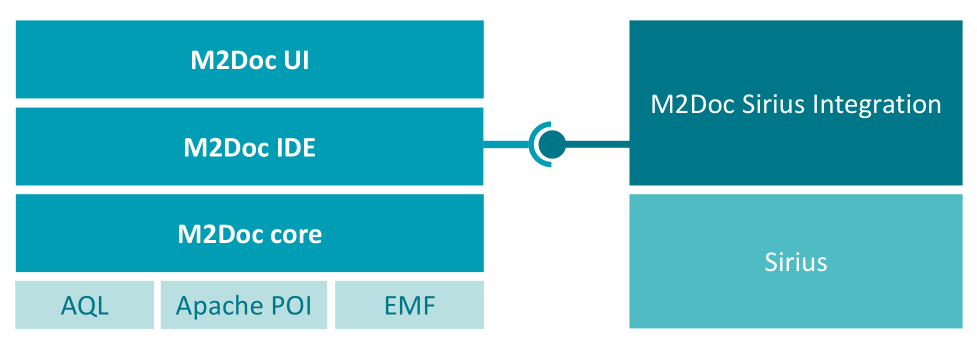
The architecture of M2Doc is organized around three building blocks:
- Apache POI for the parsing and generation of OOXML documents
- AQL for querying the models
- EMF as a general platform
Generating a document
To generate a document you will need at least a template file (.docx file) and a generation configuration model (.genconf file). If you don’t have the template you can read the template authoring section. To create a generation model file you can read the initialize generation section.
Launching a generation
To launch a generation you can right click on the generation configuration model (.genconf file) or the Generation object and select the «Generate Documentation menu» as shown here:

You can also use the «M2Doc Generate Template» menu on the template that is referenced by one or more generation configuration models (.genconf file):

Or the «M2Doc Update Document» menu on the generated document that is referenced by one or more generation configuration models (.genconf file):

If you don’t have the the generation model configuration file you can create it using the initialize generation section.
Initializing a generation configuration
To initialize a generation configuration you will need a template file (.docx file). If you don’t have the template you can read the template authoring section.
Right click on the template file and select the «Initialize Documentation Configuration» menu:

To edit the created generation model file you can use the Generation configuration wizard.
Validating a generation setup
To validate a generation setup (template plus generation configuration) you can right click on the generation configuration model (.genconf file) or the Generation object and select the «Validate Documentation menu» as shown here:

If you don’t have the the generation configuration model file you can create it using the initialize generation section. If the validation succeeds with no informations, warnings, or errors you will be prompted. If something went wrong a .docx file with the name of the template and suffixed with «info», «warning», or «error» will be created. This new file contains details of the validation issues. The template is not modified.
Generation configuration wizard
You can access the generation configuration wizard in two different ways, one for creating it and one for further edition when the .genconf file already exists.
To create and initialize the generation configuration, select the template .docx file to use for generation and right click on it:
To edit an existing generation configuration .genconf file you can select the .genconf file and right click on it:

At this point you should be on the first page of the generation configuration wizard:

On this page you can select the path of the generation configuration .genconf file. It can be changed to create a copy of an existing file for instance. Other file paths are relative to the generation configuration file. This allow to move a folder containing all the files needed for a generation without breaking the generation configuration. The template can be selected from the workspace or the Template registry. In the later case the path will be absolute to reference the template in the deployed plug-ins.
The next page of the wizard is dedicated to variables and binding values to them:

To reference new values you can load new resources using the Load resource button. Note the Options (expert) tab that allow to set advanced options to find values from a Sirius session for instance.
If you are using M2Doc with Sirius, Obeo Designer, Obeo Designer Team, Capella, or Team for Capella, you need to set the SiriusSession option. This will allow you to use Sirius services like exporting diagrams as images:

Setting this option should allow you to select model elements for each model variable you have in your template. By default the first element matching the declared type of the variable will be selected, but you can edit the value by selecting the variable and using the edit button:

When the Finish button is pushed the generation configuration file is created or edited.
You can also use M2Doc with Team for Capella or Obeo Designer Team. If you had existing .genconf files before you shared your project to Team for Capella or Obeo Designer Team, you will need to edit them.
First you need to change the SiriusSession since the .aird file has been renamed. You should need to add “team” like this:
- In-Flight Entertainment System.aird
becomes:
- In-Flight Entertainment System.team.aird
Secondly you will need to set the value of your model variables since the model has been moved to the Team server. By default the first element matching the declared type of the variable will be selected, but you can edit the value by selecting the variable and using the edit button:
You will see your model to select the value from:

Template authoring
You need to have a model already to be able to generate a document with M2Doc. Then you can create a project or if you already have a project, you can create a template.
New project wizard
This wizard allows to create all needed artifacts:
- an Eclipse project
- a default template
- the genconf file
You only need your model as input.
To launch the wizard right click in the project exporer and select new project:

Then select M2Doc project in the M2Doc category:

Enter your project name and click next:

Enter your template name and click next:

Select the main variable value and name then click next:


The last page of the wizard is dedicated to file pathes:

NOTE: you can also start the generation on finish.
New template wizard
This wizard creates a simple template from a model.
To launch the wizard right click in the project exporer and select new other:

Then select new template in the M2Doc category and click next:

Enter your template name:

Select the main variable value and name then click next:


The template is created after clicking finish:

M2Doc interpreter view
The M2Doc interpreter view provides completion for AQL expressions in the context of a generation model (.genconf file). To create a generation model file you can read the initialize generation section.
To open the M2Doc interpreter view, select the Windows / Show View / Other… :

Then select the M2Doc interpreter in the M2Doc category:

To start using the view, you need to select a generation model (.genconf file):

Select your generation model (.genconf file) in the following dialog:

You can then start typing AQL expressions and use CTRL+SPACE for completion:

Note that you have access to variables declared in your template and also to a variable named «selection» that contains the current selected element.
You can also use the reload command to refresh the generation context, for instance when the template is modified or the source code of your services is modified:

When an error/warning/info is detected, you can over the message to highlight the corresponding part of the expression:

Syntax
The template should be edited using your Microsoft Word document editor. M2Doc uses Word fields to declare dynamic elements. To make fields visible during the edition of your template in Microsoft Word, use ALT+F9. To insert a new field, use CTRL+F9.
All syntax elements of M2Doc should be placed into fields using ALT+F9 to show fields and CTRL+F9 to insert a new field. M2Doc is an imperative template language built on top of AQL for querying. The language supports type inference and can be extended using custom services.
In order to create your AQL expressions with completion and see the result for a selected object you can use the M2Doc interpreter.
In the following explanations { and } will denote a Word field.
Note that fields are also used by Microsoft Word page number, table of contents, … Switching from field visualization mode to field edition mode will change the visualization of the document:

ALT+F9

Comment (example)
A simple comment, nothing is generated. It can be used to add specific text style to your document without having the text generated. The style can then be used later in the template.
{m:comment any text}
If you want to use a variable named ‘comment’ you can use an extra space after ‘m:’.
Comment block (example)
A comment block, the commented block is not generated. It can be used to add specific text or table style, or numbering to your document without having the text or table generated. The style or numbering can then be used later in the template.
{m:commentblock any text}
...commented block...
{m:endcommentblock}
If you want to use a variable named ‘commentblock’ or ‘endcommentblock’ you can use an extra space after ‘m:’.
Static statement
Anything that is not a M2Doc field is generated as is.
Query (example)
The AQL expression is evaluated and its result is inserted in the generated document. M2Doc services and provided services can be used. Some specific return types will be interpreted by M2Doc.
{m:AQL expression}
Conditional (example)
If the condition is true the «then block» is inserted in the generated document. if it’s false and the «else if» condition is true the «else if block» is inserted. if all condition are false the «else block» is inserted. You can have zero or more «elseif blocks», zero or one «else block». All AQL expressions should evaluate to a Boolean.
{m:if AQL expression}
...then block...
{m:elseif AQL expression}
...else if block...
{m:else}
...else block...
` {m:endif}`
If you want to use a variable named ‘elseif’, ‘else’, ‘endif’ you can use an extra space after ‘m:’. You can also use the AQL if exression if you add a space after ‘m:’.
Repetition (example)
Generates the «repetition block» for each value of the AQL expression.
{m:for variable | AQL expression} ...repetition block... {m:endfor}
If you want to use a variable named ‘for’ or ‘endfor’ you can use an extra space after ‘m:’.
Let (example)
Declares a variable named «variable» with the result of the AQL expression as its value. The variable is accessible in the «let block».
{m:let variable = AQL expression} ...let block... {m:endlet}
If you want to use a variable named ‘endlet’ you can use an extra space after ‘m:’. You can also use the AQL let exression if you add a space after ‘m:’.
Bookmark (example)
Generates a bookmark with the result of the AQL expression as identifier and the «bookmark block» as content.
{m:bookmark AQL expression} ...bookmark block... {m:endbookmark}
If you want to use a variable named ‘bookmark’ or ‘endbookmark’ you can use an extra space after ‘m:’.
Link (example)
Generates a link to the bookmark with the given identifier and text.
{m:link AQL expression AQL expression}
The first AQL expression id the identifier and the second one is the text to display. If you want to use a variable named ‘link’ you can use an extra space after ‘m:’.
User Documentation (example)
Generates a user content block in the resulting document. If the generated document exists and already has a user content with the same id the previous user content is preserved, otherwise the «userdoc block» is generated.
{m:userdoc AQL expression} ...user block... {m:enduserdoc}
If a user content exists in a previously generated document and the id is not re-generated, the user content will by removed from the generated document and saved in a «lost» file. If you want to use a variable named ‘userdoc’ or ‘enduserdoc’ you can use an extra space after ‘m:’.
Template construct (example)
A template construct is basically a block of template with parameters that can be called like a service. When the template construct is called its contents is inserted after all dynamic parts have been interpreted by M2Doc.
{m:template myTemplate(a : Integer, b : Integer)} ...user block... {m:endtemplate}
This template can be called as follow using a simple query:
{m:1.myTemplate(3)}
If you want more examples of M2Doc syntax you can have a look at the nominal cases in unit tests. If you want to use a variable named ‘template’ or ‘endtemplate’ you can use an extra space after ‘m:’.
Services
All AQL services are available. On top of that, specific services are provided by M2Doc. See the following reference documentation. If you don’t find your needs in this list, you can provide custom services.
- Boolean services
- EObject services
- Excel services
- HTML services
- Image services
- Link services
- Prompt services
- Prompt services (SWT)
- Pagination services
- Sirius services (Note: M2Doc versions 1.1.0 and above are compatible with Obeo Designer Team Edition.)
- you will have to add the following packages nsURI (see Template properties wizard section): http://www.eclipse.org/sirius/1.1.0, http://www.eclipse.org/sirius/diagram/1.1.0, and/or http://www.eclipse.org/sirius/diagram/sequence/2.0.0.
- Wikitext services (exprerimental)
Services specific to the M2Doc Capella extensions:
NOTE: you will have to manually import the two services classes or select the “Capella” package in the Template properties wizard:
- org.obeonetwork.capella.m2doc.aql.queries.M2DocGenServices
- org.obeonetwork.capella.m2doc.aql.queries.SemanticBrowserServices
Template properties wizard
The template propeties wizard allows to configure the template. You will be able to add or remove used metamodels (nsURI), service classes, you will also be able to specify the type of the variable used as input of your template.
To open the template properties wizard, you can select a template .docx file and right click on it:

The first page of the wizard let you select template metamodels and services packages.

When a service package is included in one or more other service packages you can have the following page:

In this example, the “other test token” is included in the “test token”. “other test token” can’t be deselected without deselecting “test token”.
Note you can also use the nsURI (expert) and Services (expert) to select metamodels and services manually.
The second page is dedicated to variable declarations. The list of declarations is initialized from the variable used in the template.

The M2Doc version to use with this template can be changed on this page. Not having this property set will trigger a warning while validating with M2Doc 2.0.0 or above.
Template custom properties
You can use the Template properties wizard. But you can also edit them using your Microsoft Word document editor (see this page). This section will describe possible properties name and value used by M2Doc.
M2Doc version custom properties
To define the version of M2Doc to use with this template you can set a custom property as follow
- Name:
m:M2DocVersion - Value: M2Doc version
For example:
- Name:
m:M2DocVersion - Value:
2.0.0
Not having this property set will trigger a warning while validating with M2Doc 2.0.0 or above.
Variable custom properties
To define variables you can set a custom property as follow
- Name:
m:var:variable name - Value: variable type
For example:
- Name:
m:var:self - Value:
ecore::EPackage
Package custom properties
To use new EMF packages for typing you can add the following custom property:
- Name:
m:uri:EPackage nsURI - Value:
For example:
- Name:
m:uri:https://www.eclipse.org/uml2/5.0.0/UML - Value:
Service custom properties
To import a service class with a default constructor. To use a service class with a custom constructor you can read the custom constructor section.
- Name:
m:import:qualified class name - Value: bundle symbolic name
For example:
- Name:
m:import:org.obeonetwork.m2doc.rcptt.a.ServiceClassA - Value:
org.obeonetwork.m2doc.rcptt.a
Providing new services
You can extends M2Doc by adding services to your templates using the Template properties wizard. A service is a simple Java method with at least one parameter and a return value.
Service class
There are two cases for the class containing the service: either it has a default constructor, or it has a constructor with a parameter.
Default constructor
When the class has no explicit constructor or the constructor doesn’t have any parameters. In this case you don’t need any specific development except for your service method. You can have a look at specific return types if you want to insert images, table, etc… To use your services in your template simply add them through the Template properties wizard.
Custom constructor
When there is an explicit constructor with at least a parameter M2Doc can’t instantiate your class since there is no default constructor. You need to implement the IServicesConfigurator interface. This interface link one or more options in the generation configuration to the service class in order to instantiate it. You need to use the org.obeonetwork.m2doc.ide.servicesConfigurator extension point to declare your implementation of IServicesConfigurator. If you want to use your implementation in standalone you can register it programmatically using M2DocUtils.registerServicesConfigurator().
An example of implementation can be found in the Sirius integration plug-in see the class SiriusServiceConfigurator and the extension in the plugin.xml.
Special return types
The M2Doc evaluation engine converts any object to a string in order to insert it in the generated document. To add flexibility in the produced document we chose to expose some special types to service creators. Those types are MElement and allow directly inserting document artifacts:
- MPagination to insert a table of contents, a new page, a new paragraph, a new column, or a new text wrapping.
- MBookmark to insert a new bookmark or a reference to a bookmark.
- MHyperLink to insert a new link to an URL.
- MImage to insert a new image.
- MTable to insert a new table.
- MText to insert styled text.
- MList to insert a list of MElement.
Default implementations are also provided by M2Doc in this package.
Extension points
Services and packages token
The services and packages token extension point org.obeonetwork.m2doc.ide.services.register can be used to reference a set of service classes and packages using a token name. This token can be selected using «Select tokens» menu in the Template properties wizard. You can find an example of this extension point here.
Template registry
It’s possible to package your templates and deploy them in Eclipse plugins. To register them you can use the extension point org.obeonetwork.m2doc.ide.templates.register, ther is an example here.
Import registered template
Once a template is registered (see the Template registry section), you can import it in the workspace for further modifications for instance:
Select the template import wizard:


Template testing
To simplify unit testing while developing M2Doc, a JUnit test suite has been implemented. It uses a given folder as input and lists each sub directory following a naming pattern as a test case. You can use the same test suite for your own tests. An example of the test suite implementation QueryTests with the folder resources/query.
Maven
You can launch your generation using Maven and Tycho. An example is available here. You may probably need to have a look at the pom.xml file. To launch the build and the generation you can simply use the following command:
mvn clean verify
Using M2Doc programmatically
This section is for developers wanting to integrate M2Doc in their own project. It will show how to use the main features of M2Doc programmatically. Since M2Doc uses AQL for expressions it can be useful to have a look at Using AQL programmatically.
Parsing
The following sample code shows how to load a template .docx file using M2Doc:
final URI templateURI = ...; // the URI of the template

// can be empty, if you are using a Generation use GenconfUtils.getOptions(generation)
final Map<String, String> options = ...;
List<Exception> exceptions = new ArrayList<>();

final ResourceSet resourceSetForModels = M2DocUtils.createResourceSetForModels(exceptions , key, new ResourceSetImpl(), options);

// if you are using a Generation use GenconfUtils.getQueryEnvironment(resourceSetForModels, generation)
final IQueryEnvironment queryEnvironment = M2DocUtils.getQueryEnvironment(resourceSetForModels, templateURI, options); // delegate to IServicesConfigurator

final IClassProvider classProvider = new ClassProvider(this.getClass().getClassLoader()); // use M2DocPlugin.getClassProvider() when running inside Eclipse
try (DocumentTemplate template = M2DocUtils.parse(resourceSetForModels.getURIConverter(), templateURI, queryEnvironment, classProvider, monitor)) {
    // use the template
} finally {
    M2DocUtils.cleanResourceSetForModels(key, resourceSetForModels);
}
Validation
The validation is optional:
final ValidationMessageLevel validationLevel = M2DocUtils.validate(template, queryEnvironment, monitor);
if (validationLevel != ValidationMessageLevel.OK) {
    final URI validationResulURI = ...; // some place to serialize the result of the validation
    M2DocUtils.serializeValidatedDocumentTemplate(resourceSetForModels.getURIConverter(), documentTemplate, validationResulURI);
}
Generation
The generation will produce the final document where M2Doc template is evaluated against the given variables. There are two levels of API for the generation: directly from the DocumentTemplate or from the Generation.
Core generation API
final Map<String, Object> variables = ...; // your variables and values
final URI outputURI = ...; // some place to serialize the result of the generation
M2DocUtils.generate(template, queryEnvironment, variables, resourceSetForModels, outputURI, monitor);
Generation configuration API
final Generation generation = ...; // load from a serialized EMF model or create in memory
final IClassProvider classProvider = new ClassProvider(this.getClass().getClassLoader()); // use M2DocPlugin.getClassProvider() when running inside Eclipse
GenconfUtils.generate(generation, classProvider, monitor);